Recently I have had a gentle nudge from a couple of people to continue my blog posts, as everyone can appreciate thinks occasionally fall be the wayside especially when children are about.
In my first post I discussed how to set up the eclipse environment for creating Domino OSGI Plugins and in the second how to configure Domino Designer ready install your plugins.
In this post I'm going to walk through creating a very simple plugin, a standard page banner/header.
Firstly you will need to create a new project:
File -> New -> Plug-in Project
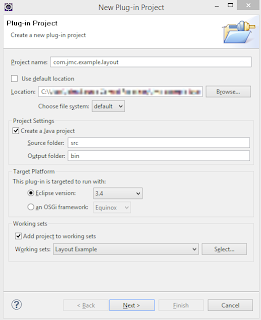
Enter a project name, change the location if you wish and add to a working set if you like (I always do).
Click Next
Change the name if you wish and un-tick Generate an Activator and click Next
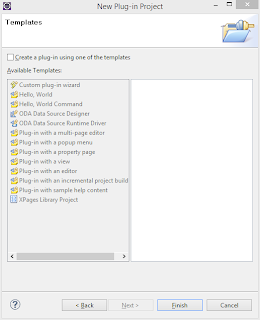
Un-tick Create a plug-in using one of the templates
To create a component you will need use some of the built-in Domino libraries therefore we will need to add them as dependencies to the project.
To import the required libraries open the Manifest.MF file, open the dependencies tab and click add
Type com.ibm.commons into the text box then select the plug-in from the list and click OK
Now select the newly added plugin and click properties
Delete the minimum version and click OK
Now do the same again for 'com.ibm.xsp.core'
The next step will be to create some classes, one for the component itself, one for the renderer and one for the library extension point. We will also need to create some of config files.
To create the component class right click the src folder and click New -> Class
In the new class window enter a package name, name for the class and add a superclass 'javax.faces.component.UIOutput'
Click Finish
In your newly create class you will need to set a renderer and a family, in this example I have created static variables then set the renderer type in the constructor and and overridden the getFamily method.
1 2 3 4 5 6 7 8 9 10 11 12 13 14 15 16 | public class HeaderComponent extends UIOutput { private static final String DEFAULT_RENDERER_TYPE = "com.jmc.example.layout.header"; private static final String DEFAULT_FAMILY = "com.jmc.example.layout"; public HeaderComponent(){ setRendererType(DEFAULT_RENDERER_TYPE); } @Override public String getFamily() { return DEFAULT_FAMILY; } } |
Next we will need to create a renderer class.
In the new class window enter a package name, name for the class and add a superclass 'com.ibm.xsp.renderkit.FacesRenderer' and click Finish
This new renderer class will be used to output the HTML markup for the component
In the example I generate the markup in the encodeEnd method using a response writer.
1 2 3 4 5 6 7 8 9 10 11 12 13 14 15 16 17 18 19 20 21 22 23 24 25 26 27 28 29 30 31 32 33 34 35 36 37 38 39 40 | package com.jmc.xsp.example.layout.renderer; import java.io.IOException; import javax.faces.component.UIComponent; import javax.faces.context.FacesContext; import javax.faces.context.ResponseWriter; import com.ibm.xsp.renderkit.FacesRenderer; import com.jmc.xsp.example.layout.component.HeaderComponent; public class HeaderRenderer extends FacesRenderer { public void encodeBegin(FacesContext context, UIComponent component) throws IOException { // nothing needed here as all rendering being done in encodeEnd } public void encodeEnd(FacesContext context, UIComponent component) throws IOException { //check the component is the header component as expected if (!(component instanceof HeaderComponent)) { throw new IOException( "HeaderRenderer must be used with an instance of the Header Component"); } HeaderComponent header = (HeaderComponent) component; ResponseWriter writer = context.getResponseWriter(); // Write the header tag writer.startElement("header", header); // Add some content writer.startElement("h1", header); writer.write("Header Component"); writer.endElement("h1"); //close the header tag writer.endElement("header"); } } |
We now need to create the xsp-config and the faces-config files. Some people like to store these files within a META-INF folder in the src folder personally I prefer to have them in the same package structure as the rest of the plugin.
First create a new package in the src folder, I'm going to call it 'com.jmc.xsp.example.layout.config'.
Then you need to create 2 new files inside this package; 'headerComponent.xsp-config' and 'headerComponent-faces-config.xml'.
The xsp-config file is used by Domino Designer to add the control.
1 2 3 4 5 6 7 8 9 10 11 12 13 14 15 16 17 18 19 20 21 22 23 24 25 26 27 28 29 30 31 | <faces-config> <faces-config-extension> <namespace-uri>http://www.johnmcooper.co.uk/xsp/example</namespace-uri> <default-prefix>jmc</default-prefix> </faces-config-extension> <component> <description>Layout - Header section</description> <component-type>com.jmc.example.layout.header</component-type> <component-class>com.jmc.xsp.example.layout.component.HeaderComponent</component-class> <component-extension> <tag-name>header</tag-name> <component-family>com.jmc.example.layout</component-family> <renderer-type>com.jmc.example.layout.header</renderer-type> <designer-extension> <in-palette>true</in-palette> <category>JMC Layout Controls</category> <render-markup> <?xml version="1.0" encoding="UTF-8"?> <xp:view xmlns:xp="http://www.ibm.com/xsp/core"> <xp:panel > <h1> Header Component </h1> </xp:panel> </xp:view> </render-markup> </designer-extension> </component-extension> </component> </faces-config> |
The faces-config file will be used to map the control to its corresponding renderer. This done by matching the output from the control's getFamily and getRendererType methods to the component-family and renderer-type in the file.
1 2 3 4 5 6 7 8 9 10 | <?xml version="1.0" encoding="UTF-8"?> <faces-config> <render-kit> <renderer> <component-family>com.jmc.example.layout</component-family> <renderer-type>com.jmc.example.layout.header</renderer-type> <renderer-class>com.jmc.xsp.example.layout.renderer.HeaderRenderer</renderer-class> </renderer> </render-kit> </faces-config> |
Finally we need to create a library class which is used when the library is loaded to find the names of the config files. The new class needs to have 'com.ibm.xsp.library.AbstractXspLibrary' as it's superclass.
1 2 3 4 5 6 7 8 9 10 11 12 13 14 15 16 17 18 19 20 21 22 23 24 25 | package com.jmc.xsp.example.layout.library; import com.ibm.xsp.library.AbstractXspLibrary; public class Library extends AbstractXspLibrary { public String getLibraryId() { return "com.jmc.xsp.example.layout.library"; } public String getPluginId() { return "com.jmc.xsp.example.layout"; } @Override public String[] getFacesConfigFiles() { return new String[]{ "com/jmc/xsp/example/layout/config//headerComponent-faces-config.xml" }; } @Override public String[] getXspConfigFiles() { return new String[]{ "com/jmc/xsp/example/layout/config//headerComponent.xsp-config" }; } } |
Now we have the library class we can contribute it as an extension point.
Open the MANIFEST.MF file, go to the Extensions tab, click Add and select 'com.ibm.commons.Extension'. Click Finish
You should now have a new extension listed, click service underneath the new extension then add 'com.ibm.xsp.Library' to the type field, in the class field ad the name of your library class in my case 'com.jmc.xsp.example.layout.library.Library'. Now save your changes.
You should now have an Plugin ready to be deployed to a Domino Server and Domino Designer
I have uploaded the example plugin the Bitbucket: jmc-example-layout


No comments:
Post a Comment